September 20, 2011

Gifts and Cookies


Back in high school and university, I used to spend a lot of time customizing gifts for my friends and family.  I would carefully plan out the gifts by creating detailed shopping lists that listed gift ideas and wrapping for each individual.  Yes, I spent more time planning gifts than studying...my Managerial Accounting mark can attest to this!! heh.

Sadly, I no longer spend that much time on picking out the perfect gift. Nowadays, I have to bounce ideas off of other people, give cash, or resort to gift cards. This Eid I really struggled to find things for family members and ended up getting some gift cards. I did however, try to add a personal touch by adding a homemade cookie mix to the gifts.  This idea stemmed from Bakerella's post on Mixing things up!

This is probably the simplest gift you can make. It's not too expensive and you can customize it by using different coloured Smarties or M & M's, or using different nuts.  Get a mason jar and slap on two printable labels- one for the name and the other for directions and voila! You have a great hostess or holiday gift.

*Note that the label in the picture has wrinkles in it...to avoid this, use smaller labels

Chocolate Oatmeal Cowboy Cookies


1 1/3 cup all purpose flour, spooned into measuring cup and levelled
1 tsp baking powder
1 tsp baking soda
1/4 tsp salt
1 cup cooking oats
3/4 cup Smarties (you can use M & M's if you are celebrating a holiday)
3/4 cup semi-sweet chocolate chips
1/2 cup brown sugar, packed
1/2 cup white sugar
1/3-1/2 cup chopped pecans


Before you start the layers, mix the flour, baking powder, baking soda, and salt in a bowl together.

The layers will be as follows:
1.The flour, baking powder, baking soda, and salt mixture.  .
2.The oats.
3.The Smarties.
4.The chocolate chips.
5.The brown sugar.
6.The white sugar.
7.The chopped pecans

Pack each layer down tightly so that you can fit all of the ingredients in.  If a plastic seal is missing from the mouth of the jar, take a small piece of plastic wrap and cover it up, before closing the lid.
Using printable labels, you can print out two labels- one label for the cookie name, and the other for the instructions.  I put the name of the cookie at the front of the jar, and put the instructions on the back.  Here are the instructions I used on the label:

Directions

Preheat oven to 350 degrees.
Stir dry ingredients in a large bowl and add:
1/2 cup butter, (almost melted), 1 slightly beaten egg & 1 teaspoon vanilla extract
Combine thoroughly. Roll into 1 1/2 inch balls & bake on a lined cookie sheet for 10 minutes.

If you want to make the cookies for yourself, the recipe is as follows:

1 1/3 cup all purpose flour, spooned into measuring cup and levelled
1 tsp baking powder
1 tsp baking soda
1/4 tsp salt
1 cup cooking oats
3/4 cup Smarties (you can use M & M's if you are celebrating a holiday)
3/4 cup semi-sweet chocolate chips
1/2 cup brown sugar, packed
1/2 cup white sugar
1/3-1/2 cup chopped pecans
1 egg, slightly beaten
1/2 cup butter, melted
1 tsp vanilla

Preheat the oven to 350 degrees.

Mix all of the dry ingredients in a large glass bowl.  Add in the wet ingredients and mix well.  Roll the dough into small balls, and place them, evenly spaced, on a parchment-lined cookie sheet. Bake for 10 minutes or until the edges are golden. Cool for 5 minutes on cookie sheet before transferring to cooling rack.

September 2, 2011

Eid bits and bobs and amazing sugar cookies!

Eid Mubarak to those who were celebrating or are still celebrating (like moi) this week! Having Eid on a week day ensures two things: a day off from work and loads of parties on the weekends.

Our Eid week celebrations started on Monday night with a chaand raat party at my mom's home.  A chaand raat party literally means a moon night party- it usually takes place on the 29th night of Ramadan as this is the night that groups of leaders from the Muslim community gather around and try to locate and/or find out if anyone has spotted the moon. If a moon is spotted, the Islamic month of Ramadan will be complete and the next day will be Eid. Our chaand raat party consisted of breaking our fast, eating delicious food, having wonderful conversation, keeping tabs on moon sightings, and of course mehndi/henna application.  A chaand raat party wouldn't be a chaand raat party without some mehndi!


Our Eid celebrations on Wednesday started off with congregational Eid prayers at a local community spot.  Then we headed home to snack on some sweet treats.  The rest of the day was filled with gift-giving, spending time with family and visitors, visiting family and friends, eating, and the oh-so-important Eid nap!  Round two of Eid celebrations are starting up again and will continue well into the weekend.  Thank goodness it's a long weekend...we'll have Monday to recover from all of the food that will have been consumed!


I'm sure some of you will be heading out and visiting people this weekend and since you probably don't want to go empty-handed, I suggest you try making these sugar cookies. They are soft, not too sweet and very forgiving.  You can use different cookie cutters to cut out the cookies, or roll the dough into a log and cut off cookie coins with a sharp knife.  Do what your heart (and tummy!) desires.


Sugar Cookies

1-½ cup unsalted butter, room temperature
2 cups sugar
2 eggs, room temperature
2 egg yolks, room temperature
4 tsp vanilla extract
2 tsp almond extract
4 cups white whole wheat flour
1 tsp salt
1 tsp baking powder


In a large bowl, beat together butter and sugar until well combined. Add in the 2 eggs and 2 egg yolks and mix until combined.  Mix in vanilla and almond extracts.  In another bowl, sift together flour, salt, and baking powder.  Slowly add the flour mixture to the wet ingredients and mix until combined, making sure not to over-mix the dough.

To make a small quantity of cookies, halve the dough and shape them into discs. Wrap them up with plastic wrap and stick one disc in the fridge and the other in the freezer. Otherwise, put all the dough onto some plastic wrap and form it into a disc before placing in fridge for 2-3 hours.   One hour before baking, turn the oven heat onto 350 degrees.  Roll out the dough on a floured surface to 1/4-1-8 inch thickness.  Dip a cookie cutter into some flour and begin to cut out cookies. If the dough becomes warm as you work, wrap it up and stick it into the freezer for 15-20 minutes (continue this method if the dough continues to warm up). Place the cookies on parchment-lined, cold cookie sheets and bake for 6-8 minutes or until the cookies have golden edges. Between cookie batches, let cookie sheets cool completely before reusing.
Cool cookies completely on cooling racks before icing.


Icing

1 cup powdered sugar
1 Tbsp milk (use less milk if you want a thicker icing)
1 drop fresh lemon juice
1 Tbsp light corn syrup


In a small bowl, whisk together all ingredients.  Using the tinges of a fork, drizzle the icing over cooled cookies.  Let icing set before layering cookies on a tray otherwise the cookies will stick together. (I learned that the hard way!)

August 26, 2011

Ramadan # 7 Lemony Fruit Salad Ice Pops


Today marks the last Friday and the 27th night of Ramadan. I feel like I'm about to say good by to a close friend who is leaving in a few days time and will not return for another year. And who knows what will happen in a year's time...who will be here and who will have departed. :o(  Let's all try to make the best of the time we have left with this blessed month.

------------------------------------------------------------------------------------------------------------
The summer is winding down and school will be beginning (or has already started in some places) very shortly. It would be around this time that I, along with my teacher friends, would be opening up boxes and setting up our classrooms for another school year. This would also be the time for last minute weekend getaways, parties, trips to the CNE and of course eating lots of ice cream and popsicles!

I have been noticing that some food trends from the 80s and 90s are making a come back, one of them being making homemade popsicles with plastic molds.  I remember when we were selling my parents' home, my mom and I had come across some plastic popsicle molds in one of the boxes and we decided to donate them- now I wish I had kept them because it would have saved me from spending $15 bucks on new molds. Oh well....

This recipe (from the Everyday Food Special Issue) I'm going to share with you is full of sweet and delicious seasonal fruit and tangy lemonade. I cut the recipe in half from 8 popsicles to 4.

Lemony Fruit Salad Ice Pops


1 ripe peach, washed and cut into 1/2-inch slices
1 golden kiwi, washed, peeled and sliced into 1/4 inch rounds
1/4 cup of blueberries, washed
1 frozen lemonade concentrate (the recipe used apple juice)

Follow the instructions on the frozen lemonade concentrate to make lemonade.  Arrange some fruit into 4 3-ounce ice-pop molds, making sure that the pieces fit snugly.  Pour enough lemonade into the molds to just cover the fruit.  Insert the ice-pop sticks and freeze for at least 6 hours.  To release the pops, run hot water over the frozen molds until it releases.


August 22, 2011

Ramadan # 6 Pizza, let me count the ways how I love thee!

O Lord, I seek Your forgiveness for every sin that I reproached or condemned one of Your creation for committing but then myself plunged into and brazenly committed before You.

I cannot believe we are into the final 10 days of Ramadan! Where did the month go?  Is it just me, or is time slipping by WAY TOO FAST!?  It seems like last week summer started, and then Ramadan came and now both are leaving us very shortly. *sigh*


To mark the last 10 days of Ramadan, Muslims are spending their days and nights in prayer, reflection, and remembrance of God. Since, many of us are staying out of the kitchen to focus on these activities, I wanted to share with you a simple recipe that won't take up too much of your time. Put aside the stews and curries, and bring on the pizza!

To put it simply, I love pizza! And I love making it at home! Depending on my mood, I get to experiment with different combinations of meats, spices, cheeses and vegetables that tantalize my taste buds. Ahh...my mouth is watering just thinking about that doughy goodness!

This recipe calls for freshly mixed pizza dough that should (if you want to read about my inability to find pizza dough in Pasadena, click here!) be available in your grocery store's bakery.  None of that pre-baked, cardboard-like pizza crust, okay?!

The base of my pizza is a meat sauce.  I either cook lean ground beef on the stove or use my dum keema recipe, and add a canned tomato sauce. I usually use Hunt's roasted red pepper or garlic tomato sauce.  I add some more spices- salt, chili flakes and sometimes some ground coriander.

The rest of the toppings consist of a variety of vegetables, sun dried tomatoes, jarred olives and hot peppers, and cheese!


Whole Wheat Pizza


1 pre-mixed whole wheat pizza dough, or you can make your own if you wish
1 large Hot House tomato, washed and sliced into circles
1 medium yellow onion, peeled and sliced
10 cremini mushrooms, washed and sliced
1 green pepper, washed and sliced into strips
1 red pepper, washed and cut into strips
handful of sliced and pitted green olives
handful of hot peppers
a few pieces of sun dried tomatoes, drained of oil
1 to 1 1/2 cups of shredded cheddar cheese
prepared meat sauce
1 tsp of corn meal
1 tbsp olive oil

Preheat your oven to 400 degrees.

Follow the pre-mixed pizza dough thawing instructions as some require the dough to come up to room temperature in the bag before using.

Spread oil over a round pizza tray and sprinkle it with corn meal. Stretch the pizza dough over the tray, making sure that it is stretched evenly and the crust is even all the way around.  Layer on the meat sauce and then add the vegetables.  Sprinkle the shredded cheese on top of the pizza and place the tray into the centre of the oven for 20-30 minutes or until the bottom of the pizza is cooked.  I also like to check the centre of the pizza as sometimes it can become soggy. If you find that this is happening, leave it in for another 5-10 minutes.


August 15, 2011

Ramadan # 5 Dum Keema (Steamed Ground Beef)

Oh Allah, please accept our fasts, prayers, and acts of charity during this blessed month.

Today is the 15th fast of Ramadan- the halfway point. I cannot believe how quickly this month is flying by.  The days are long and at times challenging, but well worth it.  The physical and spiritual detoxification that is occurring is necessary to remove the build up of toxins from our bodies and hearts.  It is my hope that this detox doesn't end with Ramadan, but continues throughout the year in some way.

Creating meals for your families while fasting can be a challenge because you can't taste anything to check for spice and flavour.  As a result, I have started cooking after iftar (after I break my fast at sunset).  I don't want to be slaving over the stove for a long time because I need to go to the mosque to pray taraweeh, so I like to make meals or parts of meals that are easy and quick to prepare.   

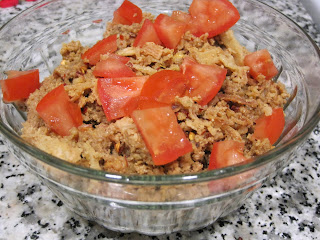
Dum keema is very versatile. It can be eaten by itself, put into sandwiches, tacos, pasta dishes or on pizza.  It is very easy to prepare and uses ingredients that you probably already have at home or can easily purchase at your grocery store.

Dum Keema


3 heaping tbsp chicken tikka masala spice
pinch of salt
1 cup low fat, organic yogurt
1 heaping tbsp each, freshly minced ginger and garlic
6 tbsp fried onions (these onions come prepackaged and are available at Indian grocery stores and the Indian section at No Frills or Loblaws)
2 lb lean ground beef, washed in a mesh sieve and drained
red chili flakes (optional)
diced tomatoes and fried onions for garnish


Preheat oven to 350 degrees.

In a medium-large bowl, mix together chicken tikka masala, yogurt, salt, garlic, ginger, and fried onions. Add in the ground beef and using your hand (or a spoon if you don't want to touch the meat), thoroughly mix together the yogurt-based masala and meat.  Once mixed, pat the meat down into a roasting pan (the pan should have a lid) into a thin layer.  Place the pan with the lid on, into the oven.  Let the meat "steam" for 15-20 minutes before taking the lid off to stir the meat.  You will notice the meat will break into big chunks, using a wooden spoon, break these chunks into small pieces.  Replace the lid and let the meat cook for another 10-15 minutes or until the meat juices have disappeared.  

Place the dum keema into a glass dish and garnish with some friend onions, red chili flakes and diced tomatoes.

August 11, 2011

Ramadan # 4 Green and Gold Kiwifruit Salsa

O Allah, I seek your forgiveness for every sin that my soul made seem to me trivial and small, and continued to make seem insignificant, until it finally entangled me in it.
While entering the grocery store last week, I came across a stand displaying gold kiwifruit.  What attracted me to the stand wasn't the actual fruit, but the freebies sticking out of a pocket below! Inside the pocket were these plastic wrapped green spoons/knives with the words "Cut and scoop" on them.  After closer examination, I discovered that the green spoons/knives were for the kiwifruit. Normally I use a regular knife to peel my kiwifruit and eat it. But this spoon/knife was taking me in another direction.  The knife side is used to cut the kiwifruit in half and the spoon side is used to spoon out the kiwifruit so that you are left with a kiwi skin cup. Pretty neat eh?

Anyhow, I stuck a couple of those spoon-knife packets into my purse and continued to explore the stand.  I pulled off a recipe card (from Zespri Kiwifruit) for green and gold kiwifruit salsa. I was hesitant in trying the recipe out because I had never before tried gold kiwifruit. After a few minutes of deliberation, I decided to go ahead and try it out.  I picked up all of the necessary ingredients, did the rest of my shopping and came home.  

I didn't make the salsa right away because the kiwis weren't that ripe. It actually worked out for me because I had to make an unexpected trip back home, so the kiwis had a few days to ripen on my kitchen counter.  

Some info on kiwifruit (came off the back of the recipe card): -

-Kiwifruit are ripe when they give in to slight pressure.
-Gold kiwifruit will last 3-7 days at room temperature and 12-14 days in the fridge.
-Green kiwifruit will last 3-7 days at room temperature and 24-28 days in the fridge.
-2 kiwifruit have less than 100 calories, more than 230% of your daily Vitamin C and 16% of your daily fiber.
-Kiwifruit also have calcium, iron, Vitamin E, zinc, folate, antioxidants, magnesium, and potassium.


Yesterday afternoon I made the salsa (with some minor alterations to the original recipe) and after R and I broke our fasts, we tried it with corn chips and I have to tell you it ROCKS!!!! Slightly sweet yet tart and oh so yummy!  

Some notes:  I used the spoon and knife utensil to create kiwi cups and it isn't as easy as it looks.  After I made a few cups, I went back to using my knife. I think I would only use the spoon and knife utensil if I wanted to serve the salsa in the cups.

Green and Gold Kiwifruit Salsa


3 Gold kiwifruit (Original recipe said 4)
3 Green kiwifruit (Original recipe said 4)
1/2 large red onion, peeled and finely diced (Original recipe said 1 cup of diced red onion. I cut up the halves and put them into a food processor to save myself time and tears)
2 tbsp fresh cilantro/coriander, washed and chopped
1 tbsp fresh mint, washed and julienned
juice of 3 small key limes (Original recipe said 1 tbsp fresh lime juice)
1 tbsp ground cumin

Slice kiwifruit into halves and peel or spoon out the fruit onto a cutting board. Dice kiwifruit into small cubes.
Put all of the ingredients into a bowl and mix gently. Refrigerate for 1 hour before serving so the flavours can blend together.  Serve with chips or as a side to chicken or fish (or in fish tacos!).


August 10, 2011

Ramadan # 3 Spinach and Almond Pesto with Fresh Mozzarella and Garlic Shrimp

O Allah, I seek your forgiveness for every sin that leaves grief in its wake, that causes remorse, that holds back sustenance, and that prevents acceptance of [my] prayers.

I really enjoy creating pasta-based concoctions in my kitchen. I usually stick with one type of pasta in my dishes, but lately I've been mixing different flour-based or vegetable-based pastas, trying to find combinations that work and that my family will eat.  One combination that I like is an equal blend of white and whole wheat pastas because you get the heartiness of the whole wheat pasta without having the dish become too heavy and dense.


A while back, I came across a blog post on pesto. The recipe was surprisingly easy and didn't require Parmesan cheese (it's hard to find Parmesan cheese without rennet in it). I tagged this recipe under "Recipes to Try ASAP" and let it be.  A couple of weeks ago, I came back to this recipe and thought I would test it out.   I changed the recipe by using almonds instead of walnuts, mixing up the pasta and adding fresh mozzarella and shrimp.


Spinach and Almond Pesto with Fresh Mozzarella and Garlic Shrimp
 

2 big handfuls of fresh baby spinach, stems removed and washed and dried
1/4 cup of almonds, skin removed
4 tbsp freshly minced garlic,
10 basil leaves, washed
4 tbsp olive oil
6 small fresh mozzarella balls, drained of liquid and sliced into quarters
15-20 frozen raw peeled and deveined shrimp, thawed and washed
1.5 cups dry whole wheat rotini pasta
1.5 cups dry white rotini pasta
salt and pepper to taste

In a food process,  mix together spinach, almonds,  3 tbsp garlic, 8 basil leaves, 2 tbsp olive oil, salt and pepper until a gritty-like texture is formed.  Taste for salt and pepper.  If a stronger flavour is desired, add more spinach, basil and almonds and give the mixture a spin in the processor.

In a frying pan, add the remaining olive oil, 1 tbsp of garlic and the 2 basil leaves (torn up into small pieces).  Saute on low-medium heat for 1 minute.  Add in the shrimp and cook until the shrimp have curled in a bit and are pink all the way through.  Season with some salt and pepper before removing from heat.

Cook the dry whole wheat and white pastas (SEPARATELY) according to box instructions.  Strain the water and mix the pasta in a large bowl with the pesto. Gently mix in the mozzarella quarters and shrimp. Taste the pasta for seasoning and add salt and pepper if necessary.  Drizzle a little bit of olive oil on top.  Serve immediately or refrigerate for a later time.